
Phishing-Resistant Authentication Protection: A Step-by-Step Guide to Implementing Certificate-Based Authentication in Entra-ID
Certificate-based authentication (CBA) represents a significant upgrade from traditional password-based logins or traditional TOTP/OTP MFA, offering phishing-resistant and passwordless access to Microsoft Entra ID (formerly Azure AD), as well as protecting critical assets and services. This article provides a comprehensive guide on implementing CBA for both end-users (user authentication) and applications (service principals), drawing from official Microsoft documentation and industry best practices.
NOTE: In this example we show how to enable Phishing Resistant Certificate Based Authentication for Intune Admin Group in light of recent “Stryker” threat actor Handala
In an era where cyber threats are increasingly sophisticated, relying solely on passwords or OTP/TOTP MFA for authentication is a significant liability. Microsoft Entra ID’s Certificate-Based Authentication (CBA) offers a robust alternative, allowing users and applications to verify their identity using X.509 digital certificates. This method not only enhances security by mitigating phishing and credential theft but can also streamline the login experience for end-users.
This guide will walk you through the two primary use cases for CBA: authenticating users (e.g., employees signing into Microsoft 365) and authenticating applications or automation tools (using service principals).
Part 1: Setting Up CBA for User Authentication
This process involves trusting your Public Key Infrastructure (PKI) with Microsoft Entra ID and configuring how certificates map to user accounts.
Prerequisites
Before you begin, ensure you have the following in place:
- A configured PKI: You need an enterprise PKI to issue certificates to your users.
- User certificates: Certificates must be issued to users and include their User Principal Name (UPN) in the certificate’s Subject Alternative Name (SAN) field as RFC822Name (email format) or another identifier.
- Administrator access: You need to be signed into the Microsoft Entra admin center with at least the Privileged Authentication Administrator role.
- Certificate Revocation Lists (CRLs): Your Certification Authorities (CAs) must publish CRLs at internet-accessible URLs. This is crucial for Microsoft Entra ID to check if a certificate has been revoked.
Step 1: Configure Your Certificate Authorities
Microsoft Entra ID must trust the CAs that issue your user certificates. You can upload your CA certificates to a new PKI-based trust store for better management.
- Navigate to the PKI blade: In the Entra admin center, go to Identity > Identity Secure Score > Public key infrastructure (PKI).

- Create a PKI container: Click + Create PKI, give it a display name (e.g., “Contoso PKI”), and create it.
- Upload your CA certificates:
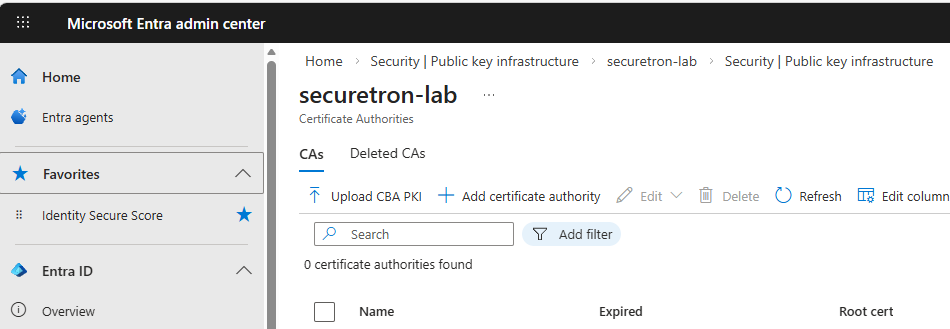
- Select the PKI container you just created.
- Click + Add certificate authority.
- Upload your root or intermediate CA certificate file (.cer).
- Specify whether it’s a Root CA.
- Enter the internet-facing URLs for your Certificate Revocation List (CRL) and optional Delta CRL .
- Ensure the Issuer hints flag is enabled (default) to improve the user experience by filtering the certificates shown to the user.
- Click Save. Repeat this process for all CAs in your chain.
Note: For large PKI deployments, you can use the Upload PKI feature to upload a
.p7bfile containing all your CA certificates at once.
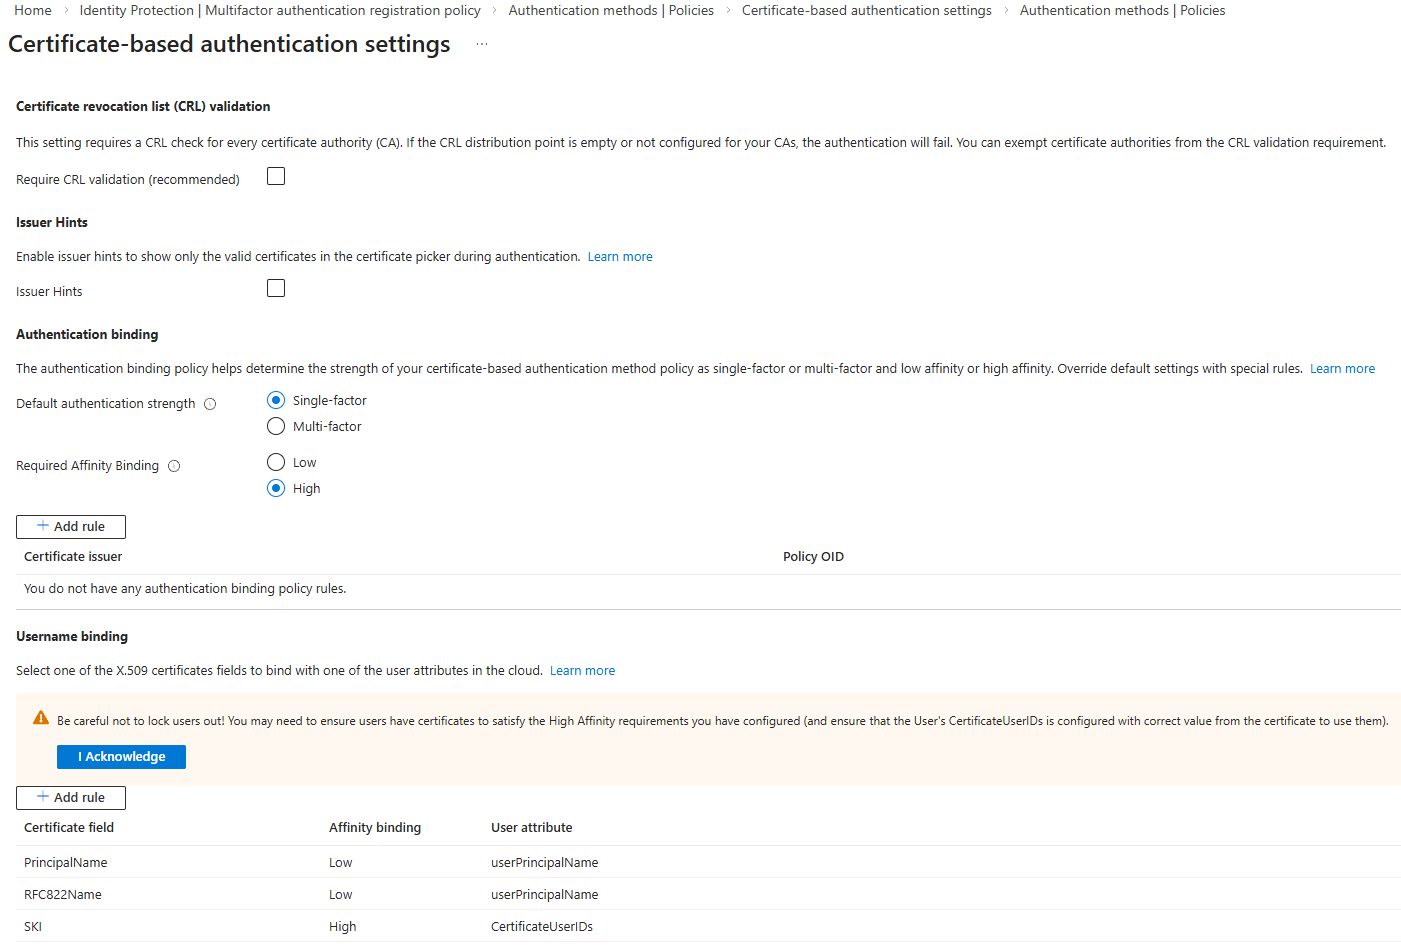
Step 2: Enable and Configure CBA on the Tenant
Once your CAs are trusted, you need to enable the CBA authentication method and define how certificates are mapped to user accounts.
- Navigate to CBA settings: Go to Protection > Authentication methods > Certificate-based authentication .

- Enable the method: On the Enable and target tab, enable the policy and select which users or groups can use CBA (e.g., “Intune Admin Group, or All Users”).

- Configure Username Binding (Mapping): This is a critical step that links a field in the certificate to a user attribute in Entra ID. Microsoft recommends using High-affinity bindings for better security, as they rely on unique, non-reusable certificate properties.
- Go to the Configuration tab.
- Under Username binding, click Add rule.
- For a high-affinity binding, select a certificate field like IssuerAndSerialNumber or SHA1PublicKey .
- Map this to a user attribute like CertificateUserIds . (You will need to populate this attribute on the user’s Entra ID object with the corresponding certificate details).
- For simpler, low-affinity setups, you can map the PrincipalName or RFC822Name (SAN) field in the certificate directly to the userPrincipalName attribute in Entra ID.
- Define Authentication Binding (Protection Level): Here you specify whether certificate authentication counts as single-factor or multi-factor authentication.
- In the same Configuration tab, under Authentication binding, you can add a rule. For example, you can configure that certificates with a key strength above a certain threshold (like 2048-bit RSA) are considered Multi-factor authentication (MFA) .
- Review and Save: Click Save to apply your configuration.
Step 3: Enforce CBA with Conditional Access (Optional but Recommended)
To truly move beyond passwords, you can create a Conditional Access policy that requires certificate-based authentication for specific applications.
- Navigate to Conditional Access: Go to Protection > Conditional Access > Policies .
- Create a new policy: Click + New policy.
- Assignments:
- Users: Select the users or groups this policy applies to.
- Target resources: Choose the cloud apps you want to protect, such as Office 365 .
- Access controls: Under Grant, select Require multi-factor authentication (which your CBA can satisfy) and/or Require authentication strength. You can create a custom authentication strength that specifically requires certificate-based authentication.
- Enable the policy: Set Enable policy to On and click Create .
With these steps, users with a valid, trusted certificate installed on their device (e.g., in the Windows certificate store) will be able to sign into applications like Microsoft 365 passwordlessly or with MFA satisfied.
Part 2: Using CBA for Applications (Service Principals)
Automation scripts and applications often need to authenticate to Azure. Using a certificate is a far more secure alternative to storing a password.
Step 1: Prepare Your Certificate
You can either create a new self-signed certificate for testing or use an existing one issued by your PKI. The certificate must have the private key and be in a supported format (.pem or .cer for the public key).
- To create a self-signed certificate (for testing), you can use the Azure CLI or OpenSSL.
- To use an existing certificate, ensure you have the public key (.cer file) ready.
- To convert a PKCS#12 (.pfx) file to the required PEM format, use OpenSSL:
openssl pkcs12 -in yourcert.pfx -clcerts -nodes -out cert.pem -passin pass:
Step 2: Create the Service Principal with the Certificate
You can create a service principal and upload its certificate using the Azure CLI.
-
Sign in to Azure CLI.
-
Run the create command. There are several ways to do this:
-
To create a new self-signed certificate and service principal:
az ad sp create-for-rbac --name MyAppWithCert \
                         --create-cert \
                         --years 2
This command outputs the
appIdand the location of the.pemfile containing the certificate and private key. -
To use an existing public certificate (.cer or .pem) :
az ad sp create-for-rbac --name MyAppWithCert \
                         --cert @/path/to/publiccertificate.cer
Important: When using an existing certificate, only upload the public key (
.cerfile) to Azure AD. The private key must remain secure on your local machine or in a secure store like Azure Key Vault.
-
-
Note the output. Make a note of the
appId(client ID) andtenantId. You will need these to authenticate.
Step 3: Use the Certificate for Authentication
Applications can now use the certificate’s private key to authenticate. For example, to log in with the Azure CLI using the service principal:
az login --service-principal \
         --username APP_ID \
         --password /path/to/cert-with-privatekey.pem \
         --tenant TENANT_ID
You can also use the certificate in PowerShell or programmatically with libraries like MSAL (Microsoft Authentication Library). The application must have access to the certificate’s private key to create a signed authentication assertion.
Conclusion
Implementing certificate-based authentication in Microsoft Entra ID is a powerful way to drastically improve your organization’s security posture. By moving away from vulnerable passwords for both users and applications as well as upgrading your traditional TOTP/OTP MFA; you embrace a phishing-resistant, passwordless future. Whether you choose to implement it for your employees accessing Microsoft 365 or for your automated DevOps scripts, the steps outlined in this guide provide a clear path to a more secure and manageable identity environment.